Have your 3D printing done by a provider
All 3D prints on this site are provided so that they can be used directly by a provider. Indeed, not everyone has at home the necessary equipment to make a 3D print and let alone when it comes to a very small part for the N scale. You can therefore have your print made by asking a specialized company, for a low fee, and the quality of professional realization.
Having your part made by a provider offers various advantages and disadvantages that you need to be aware of to make an informed choice.
Advantages and disadvantages of using a provider
Benefits :
- Delivers a professional quality result.
- Allows the production of very thin parts, especially for N scale prints.
- Allows you to select a printing technology to choose from a varied panel.
- Avoids having to have all the equipment necessary for 3D printing regardless of the technique used (filament removal, photopolymerization, etc.).
- Cost reduced to the strict minimum for the part and its manufacture in view of the number of operations to be carried out.
- Allows you to make many parts of the same quality.
- Low financial impact when increasing the number of parts.
Disadvantages:
- Requires knowledge of the characteristics of the different printing technologies because not all of them are suitable for the part to be produced.
- Once the file has entered production, there is no going back.
- High transport fees.
- Unlike PCBs, the minimum number for a 3D print is one. It is therefore necessary to print several parts to make the cost of transport profitable.
- The delivery time requires several days.
Different printing technologies
Here are the main categories of 3D printing technologies:
- Wire deposit or extrusion (FFF and FDM): A plastic filament is melted and deposited on a printing platform, forming the object layer after layer.
- Photopolymerization (SLA, DLP, LCD): A laser or a light source solidifies a liquid and photosensitive resin, point by point (SLA laser) or layer by layer (DLP, LCD).
- Powder fusion (SLS, SLM, DMLS): A laser fuses powder particles point by point.
- Material spraying (MJF): 3D printing by material spraying or material jetting consists of using a print head to deposit liquid printing material on the printing platform. As it cools, the liquid material solidifies to form the final 3D object, layer by layer.
Technologies offered by JLCPCB
SLA
A beam of UV rays is projected by a laser to polymerize (i.e. solidify) a photosensitive resin contained in a tank of the 3D printer and thus form a solid object, layer by layer.
MJF
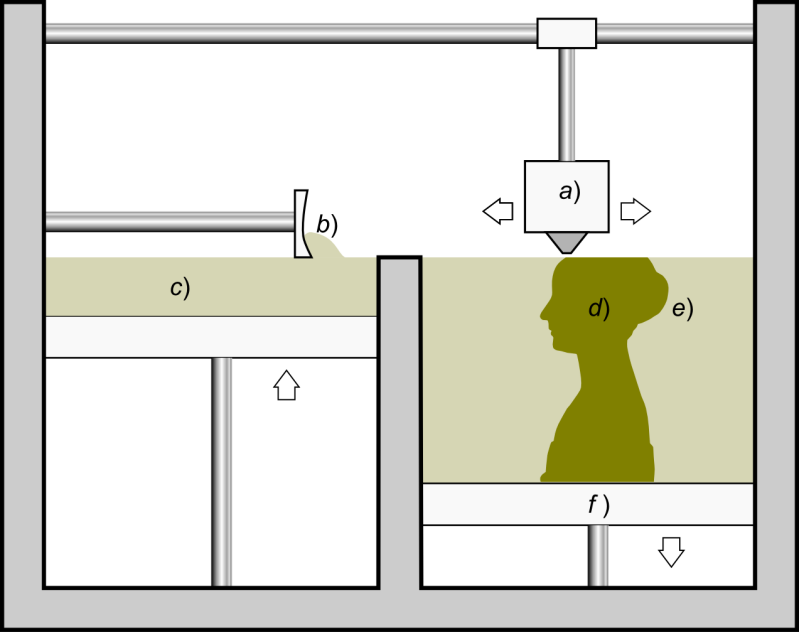
This technology consists of selectively depositing a binding agent on a powder material, in order to bind the powder particles together and thus form a solid object:
a) spray nozzles, b) powder layer spreading, c) tank powder, d) part produced, e) unused powder, f) tray.
SLM
SLM printers use a process like selective powder sintering technology: the difference is that for 3D printing by laser fusion, the powder material is fused and not simply sintered by the laser.
FDM
The 3D printer deposits the molten filament in successive layers, one on top of the other, to form the 3D object. When a layer is complete, the printing plate lowers slightly on the vertical axis and the extrusion process resumes by depositing a new layer of molten filament above the first.
- SLA: Stereolithography is one of the oldest additive manufacturing techniques. This technology makes it possible to print parts in resin using a photochemical process. SLA parts have a smooth finish, particularly suitable for realistic prototypes, requiring a certain level of detail. The parts are comparable to objects made in plastic injection.
- MJF: This additive manufacturing method is invented and developed by Hewlett-Packard (HP). It creates parts additively through a process of liquid agents. The part is created layer by layer based on the 3D model. Multi Jet Fusion technology is the fastest plastic 3D printing technology. It is the ideal technology for prototyping or rapid manufacturing. The Multi Jet Fusion plastic allows very high precision at a very low cost.
- SLM: DMLS (Direct Metal Laser Sintering) and SLM (Selective Laser Melting) are additive manufacturing methods. They make it possible to create metal 3D printed parts by aggregating fine particles of metal powder which are then welded together. The DMLS and SLM processes have many advantages in the production of metal parts for prototyping or for low-volume production by eliminating the delays caused by traditional tools. These techniques also allow the creation of intricate and highly detailed designs that could not be used with any other technology.
- FDM: Fused Deposition Modeling technology is a 3D printing technique that creates parts additively using filament. The process consists of depositing molten wire layer by layer, from a 3D model. FDM 3D printing technology is one of the most popular 3D printing techniques, it gives access to rapid manufacturing. It is a perfect option, whether for prototyping or the production of functional parts in series. It is indeed an affordable 3D printing solution for mechanical and functional parts. In addition, FDM technology offers a wide choice of materials, from plastic to metal.
- SLS: Selective Laser Sintering is an additive manufacturing method. This process creates additive parts by sintering fine particles of polymer powder to fuse them together. Like DMLS or SLM techniques, plastic parts are created layer by layer, based on the 3D model. Whether you produce an object, small or large series, SLS 3D printing technology is one of the fastest and most efficient ways to 3D print quality parts.
General principle
The general principle of making a 3D print by a service provider consists of:
- Create an account on the manufacturer's website and connect to it.
- Submit on this site the file containing the description of the part to be produced (3D file format). These files are generated automatically using 3D creation software such as FreeCAD for example (freeware).
- Configure the quantity and characteristics of the part to be produced.
- Wait for model validation.
- Pay the order.
- Wait for delivery...
Uploading and setting the 3D file
The following example is for printing a light straight mast of normal height in 1/160 scale. It is available on the targets and silhouettes page.
Connect to the JLCPCB website : https://jlcpcb.com/
- From the main menu of the JLCPCB site, select the “Order now” action.
- Select the "3D printing" tab.
- Click on the “Add 3D files” button (see opposite) and select the stl file corresponding to the part to be manufactured.
After a few seconds of loading (on the left), the part is displayed in its reserved frame and the default printing options are positioned.
You will also find (on the right) the settings used for printing small parts in N scale. After many tests, this is (in my opinion) the best value for quality and money.
At this stage, it is already possible to view your part in 3D by clicking on its representation (above the file name).
This tool allows you to check the dimensions of the object as well as the state of the facets in its status bar. It also allows you to move the camera around the object in three dimensions using the mouse, to see the object from all angles:
- left click: rotation of the camera around the object;
- right click: translation of the camera;
- wheel: zoom.
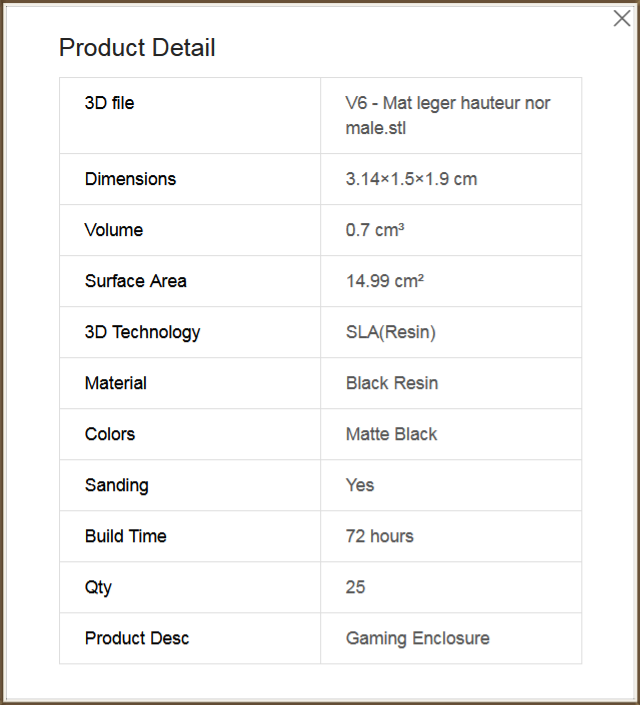
Then modify the different printing options of your part :
- The printing technology to be used, as depending on the destination of the part, certain technologies will be preferred.
- The material that will define the constraints such as printing precision, solidity, or heat resistance.
- The colour which will often depend on the selected material;
- Sandblasting which will smooth the part after printing or, without sandblasting, to obtain a rougher object.
- The quantity of parts to be produced.
Before saving the order in the cart, do not forget to define the description of the part for the attention of customs (Product desc).
Checkout
Unlike PCB manufacturing, the validation of the cart for a 3D print does not yet require its payment, but simply the choice of the type of routing.
When choosing the carrier, it is better to avoid selecting the cheapest shipping costs to prevent the package from being blocked at the border, which would generate additional costs and an extended delivery time. An order made with JLCPCB (including priority transport fees by DHL), remains at least 10 times cheaper than the same order made with a French 3D printing company!
Control step
Before going into production, a verification and control phase is carried out by specialists from the JLCPCB company. The analysis time can vary from a few hours to several days, depending on their workload. At the end, you receive an email:
- Either the file is accepted and all that's left for you to do is pay.
- Either the 3D constraints of the object are very close to the limits imposed by the selected technology, and you must validate the potential risks of breakage. (At the N scale, we constantly flirt with the technological limits linked to the thickness of the material and you will systematically have your files to validate...)
- Or the file is refused because the minimum constraints are not respected.
As long as your object has not entered the production cycle, it is possible to cancel the order.
Release
Once the file has been accepted and payment has been made, the object is sent to production :
Shipment tracking
Once the manufacturing is finished, follow the evolution of the delivery of the package.
Examples of 3D prints
You will find on this site all the 3D printing files for the different projects presented:


